Lab 6
MySQL & PHP
Goals
Learn about...
- Connecting to a database
- Fetching content from a database
- Using associative arrays
- Generating web pages in logical "chunks" from database content
Setup
Connecting to web server via FTP
Connection details have been emailed to you.
In lab, I will demonstrate how to use WinSCP to connect to our remote server.
Here are the server details:
- Hostname:
ftp.sienasellbacks.comorftp.breimer.net - Username:
yourID@sienasellbacks.comoryourID@breimer.net - Password: Sent via email
- Port: 21
- Setting: If the option exists, use Passive FTP and IPv6
- Do not use SFTP
1. Fetching content from a database
Task: Open the email with your FTP connection settings to see which server you connect to
Our two remote webservers (sienasellbacks.com and breimer.net) each have a databased for storing website content called sienasel_pages and breimern_pages
Currently, the database has a table called pages with the following fields and content:
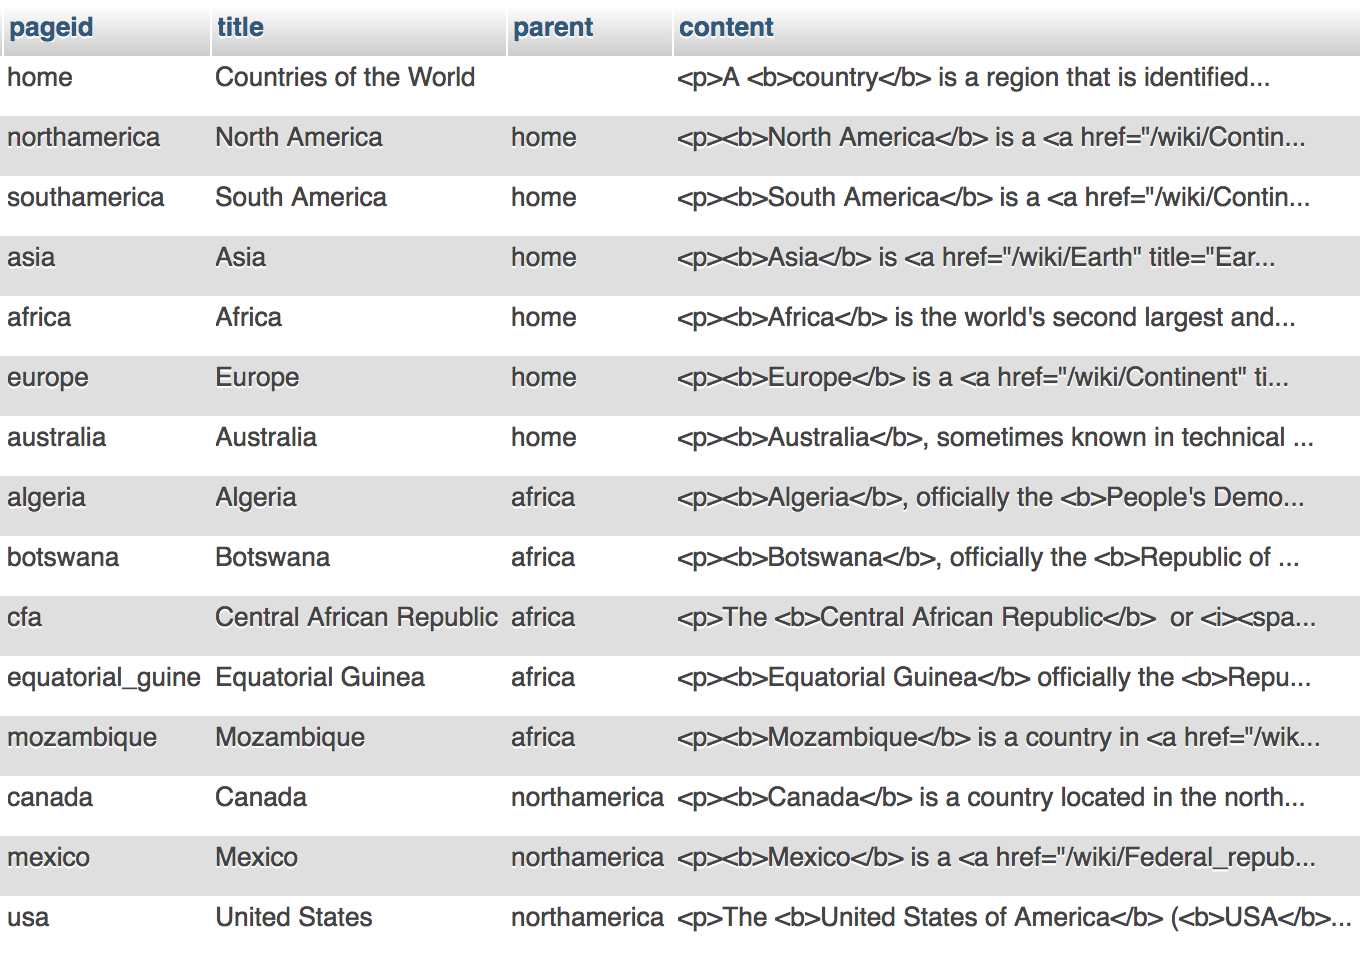
In the tasks below, you will create the following script: part1.php which fetches content from a database to create a basic web page.
Task:
Click on the part1.php link and add a URL parameter indicating the
pageid of a country, i.e., part1.php?pagid=usa. Look at the table above to see
the pageids. Try a different pageid. Try a pageid that is not likely to exist.
The script above connects to the database (sienasel_page or breimern_pages) and uses the pageid passed in the URL to fetch both the title and content. The content is simply a long text string encoded with HTML.
TASK 1a:
- In your editor of choice, create a new file called
part1.phpand save it in yourlab6folder - In
part1.php, get the pageid from the URL:
$pageid = $_GET['pageid']; - Be sure to put all your PHP code inside of the proper PHP tags, i.e., <? and ?>
- If
$pageidis null, set it equal to'home' - echo the pageid to be sure it is working.
- Using WinSCP, upload your
lab6folder to your remote server - Open Chrome and go to your URL, i.e.,
username.siencs.com/lab6orusername.breimer.net/lab6to test your script. - Try passing in a pageid using the URL, i.e.,
part1.php?pageid=usa - See what happens if you type the following URLs:
part1.php?pageid=part1.php?part1.php
TASK 1b:
- In
part1.php, add the following code below your if statement
echo_head('Countries of the World'); echo_content($pageid); echo_foot(); - Implement the
echo_head($title)function at the very top ofpart1.phpto create a minimum HTML document from the<!doctype html>tag to the openingbodytag. Instead of hardcoding the title, slice in the $title variable passed into the function. This function should echo HTML code, so use single quotes. - Implement the
echo_foot()function to echo the closingbodyandhtmltags. - Implement the
echo_content($pageid)to echo the following:'<div class="container"> <h1>Title for'.$pageid.'</h1> <main>Main content will go here</main> <p> <a class="btn btn-primary" href="?pageid=parent">Back to parent</a> </p> </div>' - Note that parent will be the pageid of the parent. We will fetch this from the database along with the title and content of the page
- Open Chrome and go to your URL, i.e.,
username.siencs.com/lab6orusername.breimer.net/lab6to test your script. - Make sure the
pageidis properly outputted in the title - Next we will fetch the title, content and parent from the database.
TASK 1c:
- In
echo_content($pageid), add the following code before your echo statement
$result = run_query("SELECT title, content, parent FROM pages WHERE pageid = '".$pageid."'"); $content = $result->fetch_assoc(); - Since MySQL queries use single quotes, we will use double quotes to specify queries.
- Notice that we are slicing in the
$pageidinto the query. - The query above, selects the title, content and parent of the specified page.
- While the query above only returns one row, other queries could return millions of rows, so MySQL is designed to only return a query "object" that can then be used to fetch one row at a time
fetch_assoc()is a method on the query "object" that return one row of data as an associative array.- Read Chapter 13.7 in the zyBook to help you implement the
run_query($sql)function. - This function takes an SQL query string as an input parameter and should return a query "object"
- To connect to our database use the
mysqliconstructor and connect to "localhost" with the following connection settings:- Username is either
sienasel_p_userorbreimern_p_userdepending on what server you are on. - The password will be written on the board
- The database name is either
sienasel_pagesorbreimern_pagesdepending on what server you are on.
- Username is either
- Once you use the constructor to create a connection "object"
$mysqli, you can execute the query string ($sql) using the following code:
$result = $mysqli->query($sql); - This function should return the query object, i.e.,
$result - Note that
$resultis not the actual data returned by the query, but rather an object that will allow us to fetch the query result row by row using either the methodfetch_row, which return a regular array, orfetch_assoc, which returns an associative array where the array indices are the field names. - Once you think you've implemented your
run_query($sql)function, modify theecho_contents($pageid)function so that the title, content and parent are properly sliced into the echo statement. - Note that
$contentshould be an associative array where$content['title']is the title of the page,$content['content']is the content of the page and$content['parent']is the parentid ot the page - Open Chrome and go to your URL, i.e.,
username.siencs.com/lab6orusername.breimer.net/lab6to test your script. - Change the URL to
part1.php?pageid=usato see if the content properly loads and to see if the back link goes to North America. Try other pageids to be sure your scripts are working.
2. Generating your menus from the database
In this next part, we will generate a navigation menu to all the pages in the database.
TASK 2a:
- Save
part1.phpaspart2.php - In
part2.php, add a function call to echo the navigation menu as follows:
echo_head('Countries of the World'); echo_nav('Countries', $pageid); echo_content($pageid); echo_foot(); - Implement the
echo_nav($short_title, $pageid)function as follows:
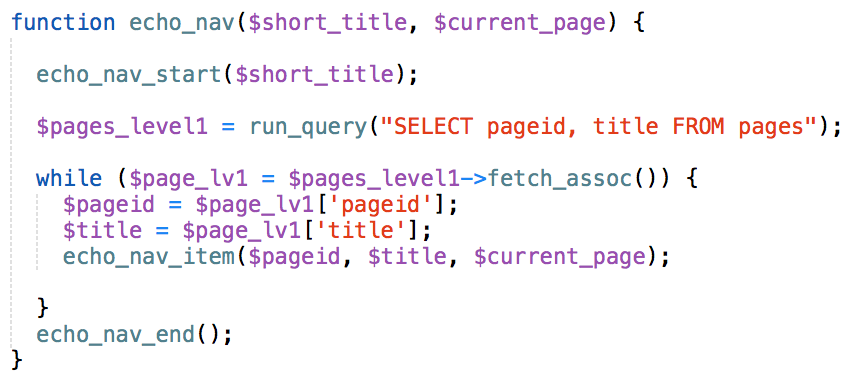
- Implement the
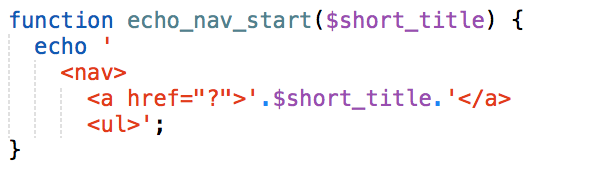
echo_nav_start($short_title)function as follows:
- Implement the
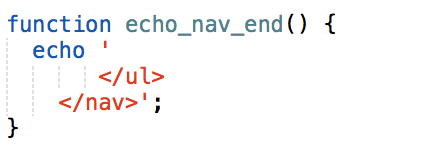
echo_nav_end()function as follows:
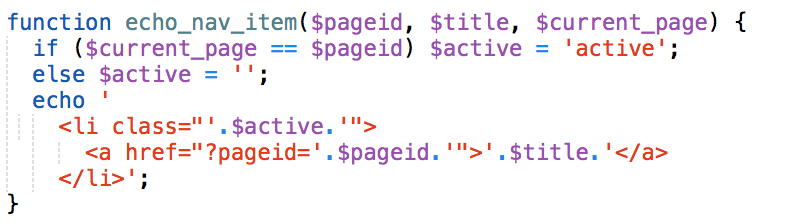
- Implement the
echo_nav_item($pageid, $title, $current_page)function as follows:
- Open Chrome and go to your URL and test
part2.phpto make sure the navigation menu works. - While this echos links to all the pages including continents, it is a useful starting point for understanding how we can generate HTML elements in logical "chunks" to build properly structured content from database queries.
In this next part, we will make some modification so the active page is highlighted
TASK 2b:
- In
part2.php, modify theecho_headfunction to include the following stylesheet:<link rel="stylesheet" href="style.css"> - In your editor of choice, create
style.cssand add CSS to give.activeelement bold text and different color - Be sure to upload your
style.cssto yourlab6folder on the server. - Open Chrome and go to your URL and test
part2.phpto make sure the active hyperlinks are changed. - This demonstrates how we can completely separate the presentation of an element from its structure and use meaningful class names to apply CSS.
- In the next part, I will demonstrate how we can apply Bootstrap CSS to completely transform the menu's appearance.
In this next part, I simply wish to demonstrate how we can add external stylesheets and additional structures with classes to transform the website to have mobile-first menu.
TASK 2c:
- Download part3.txt and save it as
part3.php - Open Chrome and go to your URL and test
part3.phpto see how the menu is rendered. - In class, we will analyze why this technique (using Bootstrap) is considered a best practice.
DELIVERABLE
You only need to upload part2.php
and submit the file in Blackboard.
If applicable, in the comment area of Blackboard put your partner's name.
Not finished?
The deliverable must be submitted in Blackboard by midnight on the day before your next scheduled lab meeting. If you wish to work alone, you can submit the deliverable yourself. However, you are encouraged to work with your partner and you can submit together. When submitting as a lab pair, be sure to include your partner's name in the comment area when you submit via Blackboard.
Do not share
Outside of lab, you are only permitted to work with your lab partner. Do not share your work with any other student.