Lab 2
HTML & CSS Continued
Lab Setup
If you have not already done so, create lab folders
- Create a folder in your user drive (Z:) for storing your course work called
csis390/. - Create a sub-folder in your
csis390folder for storing your lab work, i.e.,csis390/labs. - Create sub-folders for all the labs, i.e.,
lab1, lab2, ..., lab3.
Also, make sure you can view file extensions in Windows
- Click the Start menu
- Type "folder options" in the search and click "Folder Options" when it appears at the top of the Start menu
- A dialog box with the title "Folder Options" will appear. Click the "View" tab at the top of the window
- Click to uncheck the box for "Hide extensions for known file types"
- Click the "OK" button at the bottom of the dialog box
1. CSS & HTML Nesting
Consider the following web page with embedded CSS code:
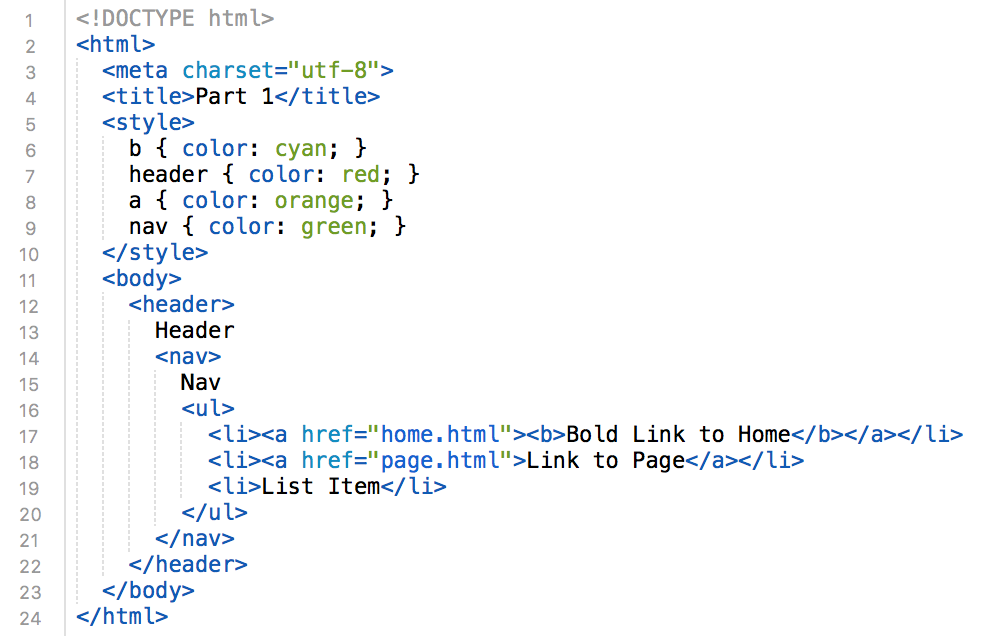
What color is each of the following?
- Header
- Nav
- Bold Link to Home
- Link to Page
- List Item
Task 1.1
Verify your answers by creating the webpage above, saving it as part1.html, validating it at validator.w3.org and then view it in a browser to confirm.
Task 1.2
Consider that List Item is green, but we never specified the color of a li tag. Explain why List Item is green and explain the general rule about how CSS is applied
to content nested in HTML. Put your answer in an HTML comment (see zyBook 2.3) in part1.html.
2. Selector Specificity
Consider the following web page with embedded CSS code:
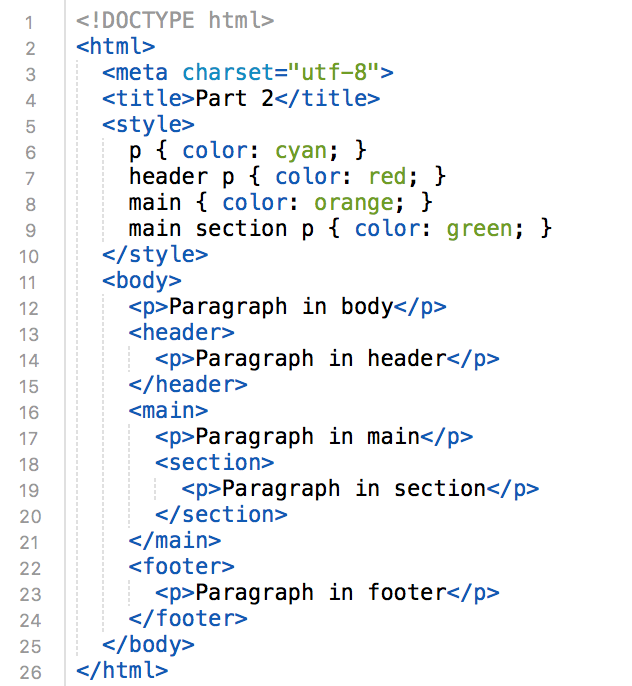
What color is each of the following?
- Paragraph in body
- Paragraph in header
- Paragraph in main
- Paragraph in section
- Paragraph in footer
Task 2.1
Verify your answers by creating the webpage above, saving it as part2.html, validating it at validator.w3.org and then view it in a browser to confirm.
Task 2.2
We specified that paragraphs should be cyan, but two paragraphs are different colors. We specified that all the content inside of main should be orange, but the paragraph in main is cyan. With these examples in mind, explain the general rule about how CSS is applied to content nesting in HTML. Put your explanation in an HTML comment (see zyBook 2.3) in part2.html.
3. class and id Selectors
Consider the following web page with embedded CSS code:
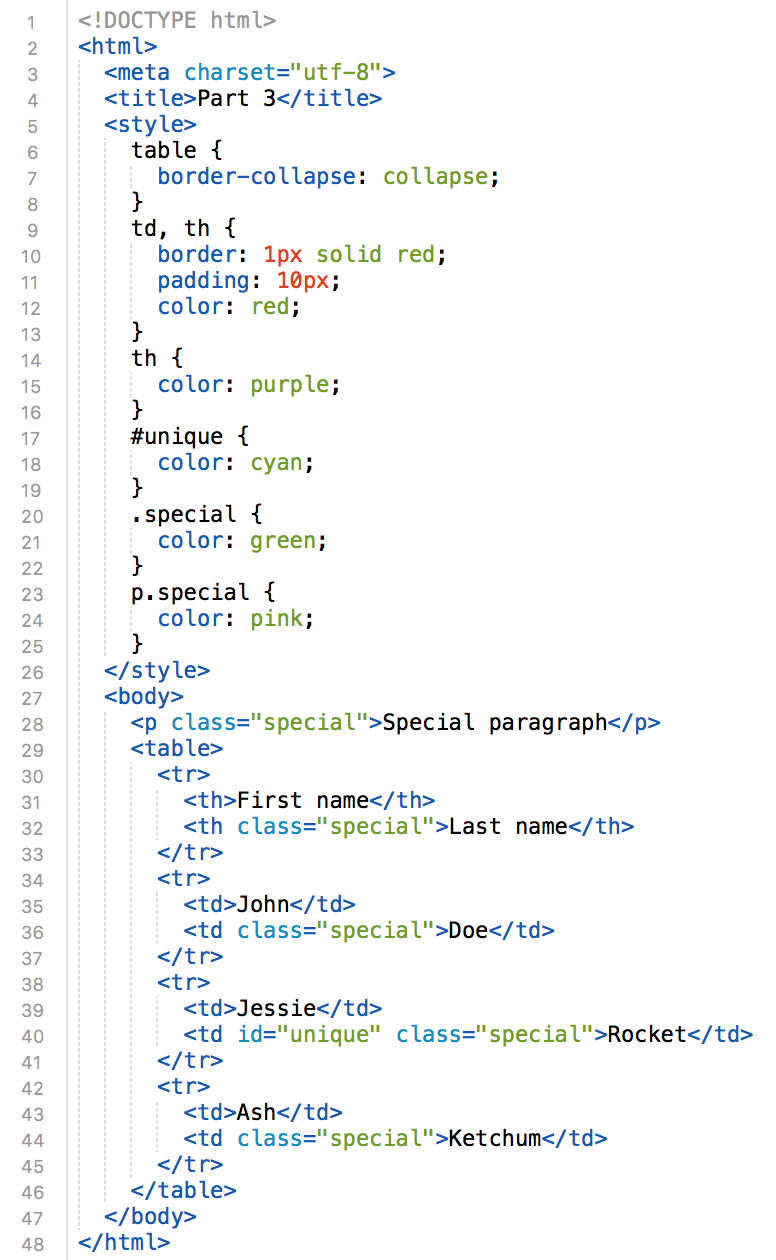
What color is each of the following?
- Special paragraph
- First name
- Last name
- John
- Doe
- Rocket
Task 3.1
Verify your answers by creating the webpage above, saving it as part3.html, validating it at validator.w3.org and then view it in a browser to confirm.
Task 3.2
Consider that we specified that all the td elements are red, but Doe is green. Obviously, we created a class called "special" to apply green to
elements. But, now consider that Rocket is cyan and Special Paragraph is pink. Explain which selectors have higher priority. Put your explanation in an HTML comment (see zyBook 2.3) in part3.html.
4. Linked, Embedded & Inline CSS and Box Model
Consider the following web page with linked, embedded and inline CSS code:

part4.css contains the following CSS code:
div {
	border: 1px solid black;
	background-color: red;
	padding: 2px;
}
What color is each of the following?
- First division
- Second division
- Third division
Task 4.1
Verify your answers by creating the webpage and CSS file above, saving them as part4.html & part4.css, validating it at validator.w3.org and then view it in a browser to confirm.
Task 4.2
Why is the first division red even though part4.html does not have any CSS code to make it red?
Why is the padding 20px when part4.css clearly has code to make the padding 2px?
Why is the third division blue even thought we apply a class that should make it green?
What do these answers tell you about the priority of linked, embedded and inline CSS code?
Put your explanation in an HTML comment (see zyBook 2.3) in part4.html.
Task 4.3
Modify the CSS code to make the division look as follows:

Hints: Give main a solid 10px cyan border, a width of 606px and set overflow: auto. Then float the div elements to the right
and set the width, padding and margin to approximate the image above.
Save your page as part4a.html
Task 4.4
Modify the CSS code to make the division look as follows:

Hints: Increase the padding of the div elements and set the margin to zero. Then calculate the exact width needed to
fit the three div's side-by-side in the 606px wide main content area. Note that width is the "content width" so you have to
consider the padding, margin and border to get the div's to fit.
Save your page as part4b.html
DELIVERABLE
Create a zip file of your lab2 folder called lab2.zip
and submit the file in Blackboard.
If applicable, put your partner's name in the comment area of Blackboard.
Not finished?
The deliverable must be submitted in Blackboard by midnight on the day before your next scheduled lab meeting. If you wish to work alone, you can submit the deliverable yourself. However, if you are assigned a partner, you can work together outside of lab and submit one deliverable together. When submitting as a lab pair, be sure to include your partner's name in the comment area when you submit via Blackboard.
Do not share
Outside of lab, you are only permitted to work with your lab partner. Do not share your work with any other student.