Lab 1
HTML & CSS Introduction
Overview
We will add HTML structure to some generic content to better understand semantic markup. Then, we will style all the HTML tags with CSS to create a typical page design. View the Final Page to see what you will create in lab. Note that the solutions HTML and CSS are compressed (called minification), which makes it very difficult to copy and use the code. Do not copy the solution and try to reverse-engineering the compression. Your code must be formatted with proper spacing and indentation.
Lab Setup
Create lab folders
- Create a folder on your user drive (Z:) for storing your course work called
csis390/. - Create a sub-folder in your
csis390folder for storing your lab work, i.e.,csis390/labs. - Create sub-folders for all the labs, i.e.,
lab1, lab2, ..., lab3.
Make sure you can view file extensions in Windows
- Click the Start menu
- Type "folder options" in the search and click "Folder Options" when it appears at the top of the Start menu
- A dialog box with the title "Folder Options" will appear. Click the "View" tab at the top of the window
- Click to uncheck the box for "Hide extensions for known file types"
- Click the "OK" button at the bottom of the dialog box
Download Starter Files
Download the following files to your own lab1 folder, i.e., csis390/labs/lab1
1. Creating Well-Structured HTML Documents
Overview
You will use HTML markup to make the web page look like this: Structure Only
The solution above has all the line breaks and extraneous white space removed, which makes it difficult to use it to cheat. Please to not just copy this code. Your solution should be properly formatted with line breaks and tabs.
Chapter 2 and 3 of the zyBook are a great reference for this part. If you do not yet have the book, Mozilla's HTML element reference is also a good source.
Setup
- Open
page1.txtin Notepad++ and immediately save it aspage1.html - Add you and your partner's name (if applicable) at the top using an HTML comment. (see zyBook 2.3)
Task
Appropriately add the following HTML tags:
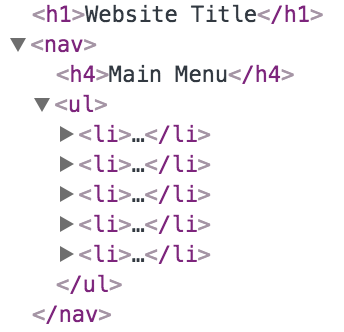
!DOCTYPEat the very top so we know its HTMLhtmlto encapsulate or wrap all the text in the file.metato use the utf-8 character settitleso the title is "Website Title"bodyto encapsulate or wrap all the content except the title and meta tags.h1for the main website title "Website Title"h4for the subheading "Main Menu"ulandlito make Page 1, Page 2, ..., Page 5 a bulleted list.ato make Page 1, Page 2, etc. hyperlinks to page1.html, page2.html, etc.navto encapsulate the "Main Menu" and bulleted list as follows:
headerto encapsulate theh1andnavabove.h2for the main web page title "Web Page Title"mainto encapsulate all the content from the web page title down to the nested list of the 3rd section.imgto insert an imagepica-sm.pngbelow the web page title. Be sure to include thealtattribute to describe the image.ato make the image a hyperlink to a larger versionpica-lg.pngsectionto encapsulate or wrap the content of the three different sections. Note that there are three section titles with content below. Each section title and the contents below it should be encapsulated with asectiontag.h3for the three section headings "Section Title"pfor the four example paragraphs in the 1st section and the sentence immediate below the 2nd and 3rd sections.table,thead,tbody,tr,thandtdto properly structure the data in the 2nd section. See Mozilla's table example for help.ul,olandlito properly structure the nested list in the 3rd section. See zyBook 2.4 for help with properly nesting lists.footerto encapsulate the bottom-most footer content.
Your web page's body (the visible content) should have the following tree-like structure when complete:
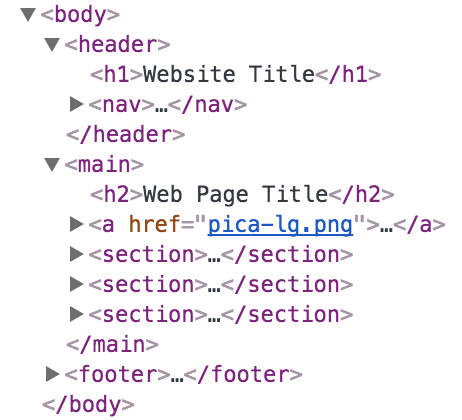
Note that the body contains header, main and footer.
And, main contains h2, a and three sections.
TASK CHECK
- Verify that the document validates at: html5.validator.nu
You can upload the file or copy all the text. - Show your instructor your completed document in Notepad++ and also show the validation results with no errors.
2. Styling Documents with CSS
Overview
You will use CSS (Cascading Stylesheets) to make the web page look like this: Final Page
The solution above has all the line breaks and extraneous white space removed, which makes it difficult to use it to cheat. Please to not just copy this code. Your solution should be properly formatted with line breaks and tabs.
Chapter 3 and 4 of the zyBook are a great reference for this part. If you do not yet have the book, Mozilla's CSS reference is also a good source.
Setup
- Open
page1.htmlin Notepad++ and add a link to a CSS file by adding the following line of code directly above thetitletag:
<link rel="stylesheet" type="text/css" href="style.css"> - Add a link to an external font source by adding
the following line of code directly above the stylesheet
linktag you just added
<link href="https://fonts.googleapis.com/css?family=Roboto:100,300,700" rel="stylesheet"> - Create a new document in Notepad++ and save it as
style.css - Open
page1.htmlin Chrome - You will add CSS code to
style.cssand then you will save the file and reloadpage1.htmlin Chrome by pressing the reload button to see the change. - To help understand CSS, you should save and reload the page after each change to see how the web page is changed.
Task
Add the following CSS code to style.css, reload page1.html to see change, and then read the
notes to better understand the changes:
-
Change the
bodyof the page:body { font-family: 'Roboto', sans-serif; background: linear-gradient(to bottom, #ddddee, #333344); margin: 0px; padding: 0px; }Notes:- We are adding 4 CSS properties to the
bodytag. - Some properties can have comma separated list of values, some can be used with functions such as linear-gradient, and some take pixel values like 0px.
- If the Roboto font in not available, we use a default sans-serif font.
- Mozilla linear-gradient reference
- Some browsers add padding and margin to the body of a webpage and to achieve a custom layout, it is often necessary to reset these values to 0px (px stands for pixel).
- We are adding 4 CSS properties to the
-
Change the
headerof the page:header { box-sizing: border-box; width: 100%; position: fixed; top: 0px; background-color: #333399; color: white; margin: 0px; padding: 10px 20px; }Notes:- We are adding 8 CSS properties to the
headertag to create a typical website header. - Adding
box-sizingandwidth: 100%makes the header as wide as possible taking up the entire width of the browser window. - Adding
position: fixedandtop: 0makes the header stick to the top. - We set the background color to a shade of blue and the font color to white.
- Margin is the space around the blue background color, which we set to zero.
- Padding is the space between the edge of the blue background color and the text. The first value (10px) is the top and bottom padding and the second value (20px) is the left and right padding. Text looks awkward when it is too close to an edge and padding makes pages more readable.
- We are adding 8 CSS properties to the
-
Change the
navof the page:nav ul { list-style: none; padding: 0px; margin: 0px; } nav li { float: left; margin: 0px; padding: 0px; } nav li a { display: inline-block; border: 1px solid #aaaaee; padding: 10px 20px; margin: 0px 5px; color: #bbbbff; background-color: #333366; text-decoration: none; } nav li a:hover { background-color: #3333dd; color: white; } nav h4 { display: none; }Notes:- We are only add properties for tags that are inside of the
navarea. - We remove the list style, margin and padding of the unordered list.
- We make each list item float from left to right instead of from top to bottom.
- We make the hyperlinks in each list item look like a button.
- We change the colors when the user hovers over the links.
- We hide the "Main Menu" as it obvious now that it is at the very top of the page.
- We are only add properties for tags that are inside of the
-
Change the
h1andnavof the header:header h1 { float: left; font-weight: 100; margin: 0px; padding: 0px; } header nav { float: right; }Notes:- This only changes the h1 and nav that are inside of the header.
- By making the h1 float left and the nav float right, they can now exist side-by-side at the very top
- We also changed the font-weight to make the Website Title very thin.
- Again, we remove any padding and margin that a web browser might add by default.
-
Change the
mainto make it look like a fixed-width page:main { width: 600px; margin: 150px auto 0px; padding: 20px; background-color: white; color: #444; box-shadow: 5px 5px 10px #444; border-radius: 20px; font-size: 1.1em; }Notes:- When margin had 3 values they are: top left/right bottom.
- We add 150px of margin to the top so the main area is always below the top header.
- The left and right margins are auto, which means they balance and center the content.
- We add colors, box-shadow, border-radius and font-size to make this area look like a page with rounded edges.
- Mozilla box-shadow reference
-
Change the
h2in the main area:main h2 { font-size: 1.8em; font-weight: 300; color: #000000; text-align: center; margin: -20px -20px 0px; padding: 5px 0; background: linear-gradient(to top, #ddaa00, #ffff00); border-top-right-radius: 15px; border-top-left-radius: 15px; }Notes:- The negative margins allow it to go flush against the edge of the main area
-
Change the
imgin the main area:main img { position: absolute; top: 60px; left: 10px; z-index: -1; }Notes:- This moves the image so that it positioned below the website title in the background (z-index level -1)
-
Change the
tablein the main area:main table { border-collapse: collapse; } main td, main th { border: 1px solid black; padding: 5px 10px } main th { background-color: #ff4422; color: white; } main tr:nth-child(even) { background-color: #ffff00; }Notes:border-collapseis necessary otherwise adjacent cells (tdandth) will have a double bordernth-childallows us to only change the even table rows
-
Change the nested list in the main area
main ul { list-style: square; } main ol { list-style: lower-roman; }Notes:- There are over 20 list styles in CSS from shapes to Roman numbers to Hebrew style.
-
Change the
pin the main areamain p { text-indent: 20px; text-align: justify; } -
Change the
footerfooter { text-align: center; color: #ccccff; padding: 20px 0 40px; } - Modify the
h3in the main area and make it look very unique by adding at least 5 CSS properties.
TASK CHECK
- Verify that your CSS code validates at: jigsaw.w3.org/css-validator
You can upload the file or copy all the text. - Show your instructor your completed CSS file in Notepad++ and also show the validation results with no errors.
DELIVERABLE
Submit, your page1.html and style.css file in Blackboard.
In the comment area of Blackboard put your partner's name if appliable.
Not finished?
The deliverable must be submitted in Blackboard by midnight on the day before your next scheduled lab meeting. If you wish to work alone, you can submit the deliverable yourself. However, you are encouraged to work with your partner and you can submit together. When submitting as a lab pair, be sure to include your partner's name in the comment area when you submit via Blackboard.
Do not share
Outside of lab, you are only permitted to work with your lab partner. Do not share your work with any other student, especially student who do not come to lab.