Lab 8
PHP & MySQL II
Building a basic trivial question application
Part 1: Connecting to the database and making another table
- Our trivia application will constantly need to connect to the database to run queries, so we should create a function in a separate file, so we do not have to duplicate the connection code throughout our application
- Open Notepad++ and create a new file called
functions.phpand be sure it is saved in yourlab8folder. - Add the following code:
function db_connect() { return new mysqli("localhost", "sienasel_sbxusr", "Sandbox@)!&", "sienasel_sandbox"); } - Note that this connects to the local database server and grants us full access to a database called
sienasel_sandbox - If you were the root administrator, you could save
functions.phpin a secure parent folder "outside" of the servers's public folder. But sadly, you do not have the necessary access to do this. But, at least the password is only stored in this one place. - To call your
db_connectfunction to run any SQL query, you need to includefunctions.phpand make the following function calls:
require_once("functions.php"); $mysqli = db_connect(); $sql = "This is an SQL Query"; $result = $mysqli->query($sql); // Use the result $result->close(); $mysqli->close(); require_onceis function that "includes" the functions.php file, but ensures that it is only include once. If the file cannot be found, execution is terminated.- Note that the SQL query is always a string encapsulated with double quotes. This is because SQL uses single quotes for values with spaces.
- Using you code from the previous lab and this new connection technique, write a new script called
make_questions_table.phpthat creates a table for storing trivia questions. - Make sure you use a URL key to protect this script so that others cannot execute it.
-
Here is the query for creating your questions table. Please read the important info below.
CREATE TABLE Questions????? (
	id INT NOT NULL AUTO_INCREMENT,
	question VARCHAR(1024) NOT NULL,
	choice1 VARCHAR(1024) NOT NULL,
	choice2 VARCHAR(1024) NOT NULL,
	choice3 VARCHAR(1024) NOT NULL,
	choice4 VARCHAR(1024) NOT NULL,
	answer INT NOT NULL,
	PRIMARY KEY (`id`)
)
-
Important Info:
- Replace ????? with a five digit number, so that your table will have a unique name. Do not pick 12345 or 54321 because everyone will do this.
- Do not use spaces in a table name.
- Each question has 6 fields: The question text, option1, option2, option3, option4 and the correct answer.
- The question and the four options are strings, which in SQL are called VARCHAR:
question VARCHAR(1024) NOT NULL,
choice1 VARCHAR(1024) NOT NULL,
choice2 VARCHAR(1024) NOT NULL,
choice3 VARCHAR(1024) NOT NULL,
choice4 VARCHAR(1024) NOT NULL
- NOT NULL enforces that the question, choices and answer must have values, otherwise an insertion will fail
- The value 1024 indicates that these strings can be at most 1024 characters long. We want to prevent the database from storing excessively large strings. An insertion will fail if our strings are too long.
- VARCHAR can be a maximum of 65,535 characters. LONGTEXT allows for millions of characters and BLOB allows for billions
- The
answerwill be encoded as an INT indicating which of the four choices is the correct answer. Thus, we do not have to duplicate the text of the correct choice in the database. We can write a query to select question, choice1, ..., choice4 and store it in an array where index 0 will be the question and indices 1,2,3 and 4 will be the choices. Thus, the answer's values of 1,2,3 and 4 will map directly to the array indices of the choices in our application. - Typically, it is a good practice for a table to have a the primary key, which can be used to uniquely identify questions that might have identical text, choices and answer. Primary keys are typically INT values that are auto incremented. The first inserted item will have an id of 1. Each time we insert a new row into the table, we increment the previous id by one and use this value as the new id. Thus, the primary key also indicates the insertion order.
- Save
make_questions_table.php - Use WinSCP to connect to the server and upload your lab folder to the server
- Type the following URL into your browser:
http://s123456.sienasellbacks.com/lab8/make_questions_table.php?key=XXX
where "s123456" is your userid and XXX is the secret code you used to protect the script. - This will create the table on the server. We will verify that it worked soon.
- Notice how we use the URL parameters and the $_GET variable to prevent others from running this code. You must know the key for the script to run.
Part 2: Adding Questions
- For now, we are going to let anyone add questions. So, we will create a completely unprotected recursive script that generates a submission form and processes the submission form.
- In Notepad++, create a file called
insert_question.phpand add the following HTML template that includes links so you can use Bootstrap 4. We will eventually use Bootstrap's classes to make the application "mobile first".<!DOCTYPE html> <html lang="en"> <head> <meta charset="utf-8"> <meta name="viewport" content="width=device-width, initial-scale=1, shrink-to-fit=no"> <title>Add Question</title> <link rel="stylesheet" href="https://maxcdn.bootstrapcdn.com/bootstrap/4.0.0-alpha.6/css/bootstrap.min.css" > </head> <body> <script src="https://code.jquery.com/jquery-3.1.1.slim.min.js"></script> <script src="https://cdnjs.cloudflare.com/ajax/libs/tether/1.4.0/js/tether.min.js"></script> <script src="https://maxcdn.bootstrapcdn.com/bootstrap/4.0.0-alpha.6/js/bootstrap.min.js"></script> </body> </html> - In the body tag and above the script tags, add HTML code to create a form with five input text fields, radio buttons to indicate which field is the correct answer and a submit button.
- Your finished form should look like this:
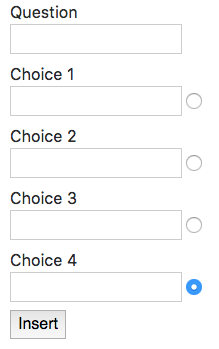
- Be sure to include the form tag and set the following attributes:
method="get"andaction="insert_question.php" - Be sure to give each form element a name, i.e.,
name="answer"andname="choice1" - The name of the submit button should be "action" and the value should be "Insert" i.e,
name="action"andvalue="Insert" - The four radio buttons should all have the same name, i.e.,
name="answer"but different values, i.e.,value="1"andvalue="2" - Google how to increase the size of input text boxes so that longer sentences can be more easily entered.
- Add a block of PHP code to the top of the document to process the form
- Use the $_POST variable to save all the form values to PHP variables:
$q = $_POST['question'];
$c1 = $_POST['choice1'];
- Using the insert user script as a model, write an if statement so that we will only perform the insert if the submit button was pressed and all the form elements are not blank, i.e. != ""
- Use the following PHP code as model for creating your insert query:
$sql = "INSERT INTO Questions????? (question, choice1, choice2, choice3, choice4, answer) VALUES ('$q','$c1','$c2','$c3','$c4','$a')"; - Replace ????? with a five digit number you used to make your table.
- Use
require_onceto include yourfunctions.phpfile - Call your
db_connectfunction and execute the query as follows:$mysqli = db_connect(); $mysqli->query($sql); $mysqli->close();
- Save
insert_question.php - Use WinSCP to connect to the server and upload your lab folder to the server
- Type the following URL into your browser:
http://s123456.sienasellbacks.com/lab8/insert_question.php
where "s123456" is your userid. - We will verify that this worked soon.
Part 3: Showing all the questions
- Use the
show_data.phpfrom the previous lab as a model to create a new script calledshow_questions.php - Note that the only change you need to make is to use the correct table name in the query.
- Save
show_questions.php - Use WinSCP to connect to the server and upload your lab folder to the server
- Use your two scripts to insert two real questions into you table.
- Verify that all the fields are correctly inserted.
Part 4: Script Integration
- The two scripts you created can be unified into one combined script where after you insert a new question the table of questions is displayed so you can see that the insertion worked.
- Think of the insert script as a big if statement where you either (a) generate the form or (b) perform the insertion and then display all the question data. The key is that you also need to generate a hyperlink so you can go back to the form. When you click the hyperlink, the Insert button's value will be null and the form will be regenerated.
- Here you can simply cut and paste code from
show_questions.phptoinsert_question.php.
Part 5: Displaying a question
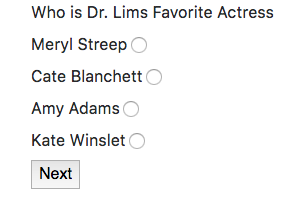
In this part, we will create a script that will randomly selects a question from the database and use it to generate a form for actually submitting an answer to a question.
Your finished form should look like this:
Help & Hints:
- Use your insert question script as starting document and save it as
get_question.php - At the top of the document use PHP code to run the following query:
SELECT question, choice1, choice2, choice3, choice4 FROM Questions????? ORDER BY RAND()
- The query above selects all the questions and orders them randomly.
- We just have to fetch the first one:
$row = $result->fetch_row();
- $row is a regular array that has the five fields we selected. Thus, we can copy
them to PHP variables as follows:
$q = $row[0];
$c1 = $row[1];
$c2 = $row[2];
- In the body of the HTML document, we can generate the form from the PHP variables as follows:
		<form method="post" action="get_question.php">

		<label><? echo $q ?><br>
		</label><br>

		<label>
		<? echo $c1 ?>
		<input type="radio" name="answer" value="1">
		</label><br>
- Notice that the form calls itself. In project 4, you will implement the processing of this dynamically generated form, which is complicated because we have to secretly store the answer.
DELIVERABLE
Create a zip file of your lab8 folder called lab8.zip
and submit the file in Blackboard.
In the comment area of Blackboard put your partner's name.