Lab 3
JavaScript Basics
Form Styling & Validation
Lab Setup
Download append.html
to your own lab3 folder, i.e., csis390/labs/lab3
1. Creating and Appending Elements
-
Open
append.htmlin Chrome. Note that it has a label and input text field. -
Open
append.htmlin Notepad++ and notice how the label and input text field are created using JavaScript. -
Add JavaScript code to create a
div,labelandinputfield for entering Birthday and then append it into the form.
Do not add HTML, instead add JavaScript code to generate the elements. -
Use
type="date"for the input element. -
Use
"pony_birthday"as thenameandidof the input element. -
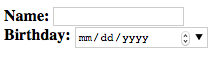
Your form should look like this:
-
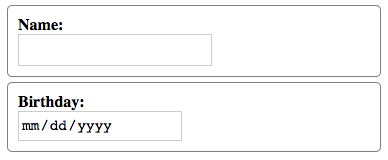
Add embedded CSS so your form looks like this:
-
Hints: Give the
divelements a 1px solid grayborder, addborder-radius,paddingandmargin. Make thelabelelementsdisplayblock. Give theinputelements aheightof 1.6rem and afont-sizeof 1.1rem.
2. Adding Event Listeners
-
Save
append.htmlasevent.html -
Be sure to open
event.htmlin you web browser.
A common mistake is to edit one file, but test a different file in the web browser. -
Add a submit button using JavaScript. Note that a submit button is just an
inputelement wheretype="submit" -
Use
value="Insert"for the submit button -
Use
"action_button"as thenameandidfor the submit button. -
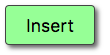
Your form should look like this:

-
Add the following event listener code to the very bottom of your JavaScript code (but still inside the
scripttag):
ponyForm.addEventListener("submit", checkForm); -
Add the following function definition at the very top of your JavaScript code (but still inside the
scripttag):
function checkForm(event) { alert("Submitting form"); } -
Save
event.htmland re-open/refresh it in Chrome. - When you click the submit button. An alert window should pop up and if you click "OK" then the form will be submitted.
-
Add more embedded CSS so your submit button looks like this:
-
Hints: To select only the submit button used the advanced selector
input[type~="submit"]and give it a height of 2.5rem and a lightgreen background-color. Add padding, border, border-radius, and box-shadow to approximate the image above. -
Add the following JavaScript code at the very bottom to create a hover effect on the submit button:
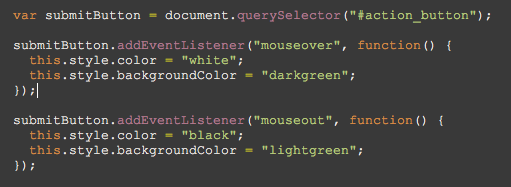
While we could have used CSS to achieve the same hover effect, this code illustrates how the CSS is implemented by web browsers. -
Important:
In the code above
thisrefers to the submit button. In general,thiscan be used to refer to the object that is the "subject" of the event. Rather than define separate functions for changing the submit button, we use an anonymous function because the function won't be reused. To learn more about the code you just added, read about:
DOM Events Anonymous Functions
TASK CHECK
Verify that event.html validates at:
html5.validator.nu
Show your instructor that the hover effect works, that the alert pops up and that the form submits properly.
3. Validating User Input
-
Save
event.htmlasvalid.html -
Be sure to open
valid.htmlin you web browser.
I want you to get into the habit of making sure you are editing the same document that you are testing. This is one of the most common problems when encountering bugs you cannot fix. It is because you are not editing the file with the bugs. -
Add code to the
checkFormfunction to make sure the Name is not blank, and to make sure the birthday year is valid. For testing purposes, a valid birthday year should be between 2000 and 2015. - Your finished form should work like this: valid.html
- Note that I have minified (compressed) the JavaScript to obfuscate the solution. You cannot just copy and paste this JavaScript. You must write it yourself with meaningful variable names and proper indenting.
Hints & Help:
- Chapter 4 in the zyBook is a JavaScript tutorial/reference. You can use it to learn about the syntax of the language.
-
All your code goes inside of the
checkFormfunction -
You can select elements using a CSS-like query selector:
var ponyNameElement = document.querySelector("#pony_name"); -
You can get the submitted value and save it to a variable:
var submittedName = ponyNameElement.value; -
JavaScript if statements are just like Java:
if (submittedName == "") { // The name is blank } -
You can prevent the form from being submitted by calling this method:
event.preventDefault(); -
You can modify the CSS of a selected element:
ponyNameElement.style.border = '5px solid red'; -
You can modify the CSS of a selected element's parent:
ponyNameElement.parentNode.style.color = 'red';
Note that this would the pony name'sdiv. -
You can select the
labelby using parent-child relationships and change the innerHTML to be the error message.
ponyNameElement.parentNode.firstChild.innerHTML = "Name is required"
Note that this would the firstlabeltag inside the pony name'sdiv. -
You can use an
if-elsestatement to switch the style back if the value is valid:if (submittedName == "") { ponyNameElement.style.border = '5px solid red'; } else { ponyNameElement.style.border = "1px solid gray"; } -
You can get the value of the submitted birthday, which is a String:
var birthdayString = ponyBirthdayElement.value; -
This string is of the form 2017-1-30. You can split it into an array using the "-" as a delimiter
var birthdayArray = birthdayString.split("-"); -
You can compare the year as follows
if (birthdayArray[0] < 2000)
VERIFY before sumbitting
Verify that valid.html validates at:
html5.validator.nu
Then, try submitting your form with invalid and valid values. Make sure it works.
DELIVERABLE
Create a zip file of your lab3 folder called lab3.zip
and submit the file in Blackboard. The zip file should contain three files:
append.html, event.html and valid.html.
In the comment area of Blackboard put your partner's name.
Not finished?
The deliverable must be submitted in Blackboard by midnight on the day before your next scheduled lab meeting. If you wish to work alone, you can submit the deliverable yourself. However, you are encouraged to work with your partner and you can submit together. When submitting as a lab pair, be sure to include your partner's name in the comment area when you submit via Blackboard.
Do not share
Outside of lab, you are only permitted to work with your lab partner. Do not share your work with any other student.